


Specifications :
Hurry and get discounts on all Apple devices up to 20%
Sale_coupon_15
₹28,910.00 (Inc. GST)
₹24,500.00 (+18% GST Extra)
Only 1 left in stock
Only 1 left in stock
To pick up today
Free
(Mon-Sat) (Please Place Order Before 1:30 PM)
Rs. 99
Our courier will deliver to the specified address
3-5 Days
Rs. 149
Our courier will deliver to the specified address
4-7 Days
Rs. 69
Payment Methods:
Here is the video for simple tutorial:
https://www.youtube.com/watch?v=07O5N0CvvLU
Or you can read the follow steps:


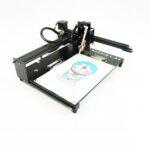
Press the power switch ,light’s on
Tips: The power light is on, the power supply is normal. If not ,try another power adapter(12V DC)

If the software cannot be connected
please download the latest version online:http://bachinmaker.com/wiki/doku.php?id=bachin_draw

select the machine type,see the NO.9>>Machine type >>Laser Engrave Machine ,Pen Writing Machine with Motor(like T-A4,ST-2039)


1.Display ‘Connected’ means the software is successful connection.
2.If the motor jitters but not move ,check the motor cable .
3.If the machine move to the opposite direction ,adjust the software setting :invert X-axis or invert Y-axis
In other cases, please contact technical support:support@bachinmaker.com

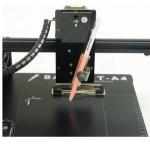
Pen up gap:3-5mm above paper


Support file type: PNG,JPEG,JPG,SVG,GCODE,DXF,BMP.

7.Enter Text
There are two text formats: New Writing — Single Line Handwriting Fonts ;

The difference between two fonts:

Choose one of the fonts ,enter or paste the words ,Generate.


If the writing result is abnormal. Please check:
1.whether the screws is loose.
2. The belt is too tight or too loose.

Multiple color plotting just supported the .svg file


Handwriting font input function only supports Android phones.

STEPS:
Click on Synchronization ,then scan the QR code handwriting input on mobile phone .Synchronization Finish.
<span “=””>The Arduino App can be downloaded from http://www.bachinmaker.com/api/write/write.apk

If you are unable to add your own fonts according to the above steps, please check the detailed tutorial here:


Only logged in customers who have purchased this product may leave a review.
Out of stock
Out of stock
No account yet?
Create an Account

Reviews
Clear filtersThere are no reviews yet.