
How To Control WS2812B Individually Addressable LEDs using Arduino

In this tutorial we will learn how to control individually addressable RGB LEDs or a WS2812B LED strip using Arduino. You can watch the following video or read the written tutorial below for more details.

How WS2812B LEDs Work
Let’s start by taking a closer look at the LED strip. It consist of type 5050 RGB LEDs in which the very compact WS2812B LED driver IC is integrated. Depending on the intensity of the three individual Red, Green, and Blue LEDs we can simulate any color we want.

What’s great about these LEDs is that we can control even the entire LED strip with just a single pin from our Arduino board. Each LED has three connectors at each end, two for the powering and one for the data. The arrow indicates the data flow direction. The data output pad of the previous LED is connected to the Data Input pad of the next LED. We can cut the strip to any size we want, as well as distance the LEDs using some wires.
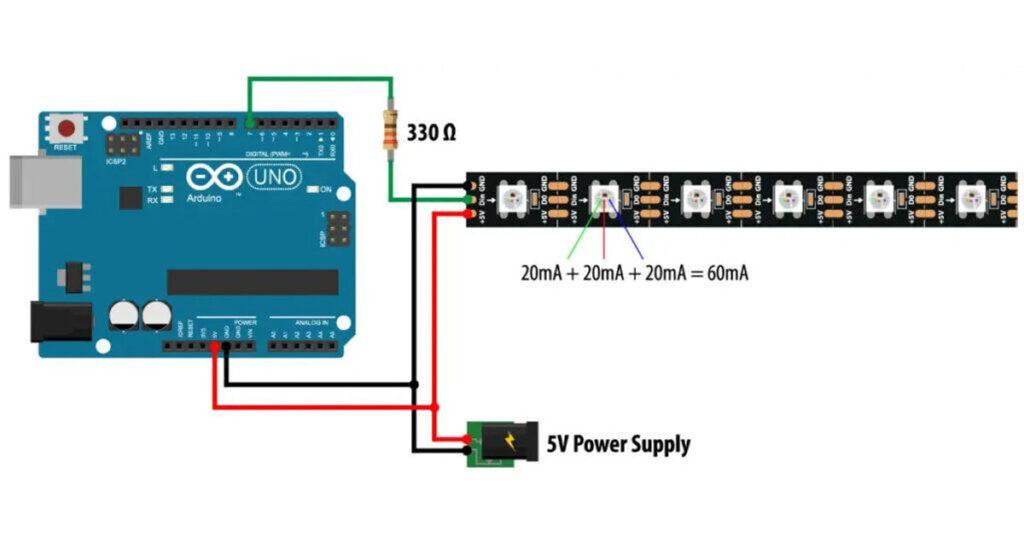
As for the powering they work on 5V and each Red, Green and Blue LED draws around 20mA, or that’s total of 60mA for each LED at full brightness. Note that when the Arduino is powered via the USB, the 5V pin can handle only around 400 mA, and when powered using the barrel power connector, the 5V pin can handle around 900 mA.If you are using more LEDs and the amount of current that they would draw exceeds the limits mentions above, you must use a separate 5V power supply. In such a case you also need to connect the two Ground lines two each other. Additionally it is recommended to use a resistor of around 330 Ohms between the Arduino and the LED strip data pin in order to reduce the noise on that line, as well as a capacitor of around 100uF across the 5V and Ground to smooth out the power supply.
Arduino and WS2812B LEDs Examples

Now as an example I will use 20 LEDs long strip, connected to the Arduino through a 330 Ohms resistor and powered with a separate 5V power supply, just as explained above. For programming the Arduino, we will use the FastLED library. This is an excellent and well documented library which enables easy control of the WS2812B LEDs.
Here’s the Arduino source code for first example:
#include <FastLED.h>

#define LED_PIN     7
#define NUM_LEDS    20

CRGB leds[NUM_LEDS];

void setup() {

  FastLED.addLeds<WS2812, LED_PIN, GRB>(leds, NUM_LEDS);

}

void loop() {

  leds[0] = CRGB(255, 0, 0);
  FastLED.show();
  delay(500);
  leds[1] = CRGB(0, 255, 0);
  FastLED.show();
  delay(500);
  leds[2] = CRGB(0, 0, 255);
  FastLED.show();
  delay(500);
  leds[5] = CRGB(150, 0, 255);
  FastLED.show();
  delay(500);
  leds[9] = CRGB(255, 200, 20);
  FastLED.show();
  delay(500);
  leds[14] = CRGB(85, 60, 180);
  FastLED.show();
  delay(500);
  leds[19] = CRGB(50, 255, 20);
  FastLED.show();
  delay(500);
}
Desctiption: So first we need to include the FastLED library, define the pin to which the LED strip data is connected, define the number of LEDs, as well as define an array of type CRGB. This type contains the LEDs, with three one-byte data members for each of the three Red, Green and Blue color channel.
In the setup section we just need to initialize the FastLED with the parameters with defined above. Now it the main loop we can control our LEDs anyhow we want. Using the CRGB function we can set any LED to any color using three parameters of Red, Green and Blue color. In order to make the change happen on the LEDs we need to call the function FastLED.show().
Example 2
Using some “for” loops we can easily make some animations.

Here’s the Arduino source code for second example:
#include <FastLED.h>

#define LED_PIN     7
#define NUM_LEDS    20

CRGB leds[NUM_LEDS];

void setup() {

  FastLED.addLeds<WS2812, LED_PIN, GRB>(leds, NUM_LEDS);

}

void loop() {

  for (int i = 0; i <= 19; i++) {
    leds[i] = CRGB ( 0, 0, 255);
    FastLED.show();
    delay(40);
  }
  for (int i = 19; i >= 0; i--) {
    leds[i] = CRGB ( 255, 0, 0);
    FastLED.show();
    delay(40);
  }
}
Here the first “for” loop lights up all 20 LEDs in blue, from the first to the last LED with 40 milliseconds delay. The next “for” loop lights up again all 20 LEDs, but this time in red color and in reverse order, from the last to the first LED.
The FastLED library features many other functions which can be used for making really interesting animations and light shows, so it’s only up to your imagination to make your next LED project shine.