
Raspberry Pi 4 Model B 4GB

The Raspberry Pi 4 Model B (4GB) is a powerful, versatile single-board computer, perfect for tech enthusiasts, hobbyists, and beginners eager to explore computing. With its compact design, robust processing power, and affordability, the Raspberry Pi 4 opens up endless possibilities. From simple educational tools to full-fledged media centers and IoT devices, this board is truly a game-changer.
In this blog, we will dive into an in-depth overview of the Raspberry Pi 4 Model B, explore its specifications, and guide you through the basic setup process to get you started on your exciting tech journey.
Key Features of Raspberry Pi 4 Model B (4GB)
The Raspberry Pi 4 Model B is a significant upgrade from its predecessors, offering better performance and more features while maintaining the same form factor. Here’s an overview of its key specifications:
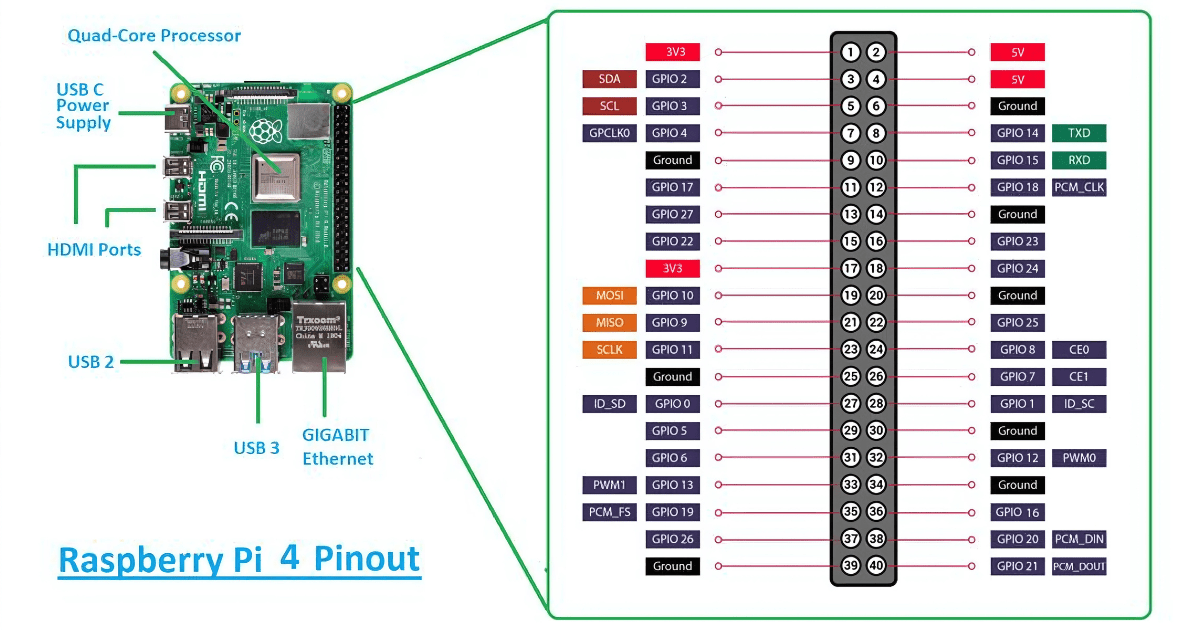
1. Processor:
- Quad-core Cortex-A72 (ARM v8) 64-bit SoC @ 1.5GHz for enhanced speed and performance.
2. Memory:
- 4GB LPDDR4-3200 SDRAM for seamless multitasking and handling of larger programs.
3. Connectivity:
- Wireless: Dual-band 802.11ac Wi-Fi for fast and reliable wireless networking.
- Bluetooth: Bluetooth 5.0 for seamless connectivity with peripheral devices.
- Ethernet: Gigabit Ethernet for high-speed wired network connections.
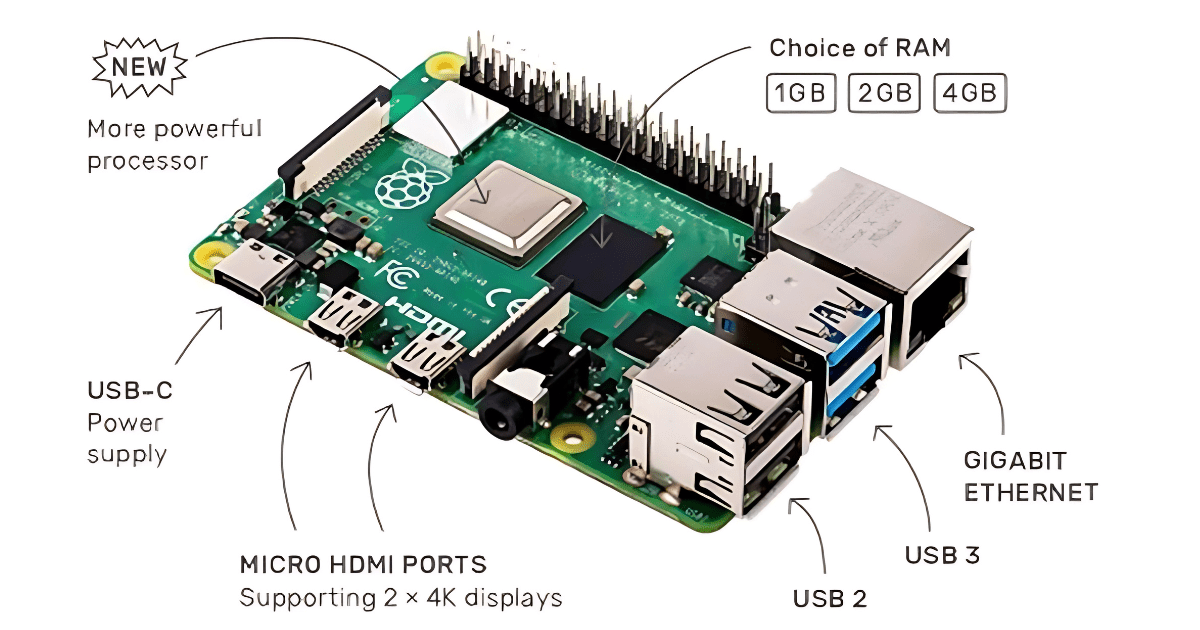
4. Ports and Interfaces:
- USB Ports: 2x USB 3.0 and 2x USB 2.0 ports for faster data transfer and peripheral support.
- HDMI Output: Dual micro-HDMI ports supporting up to 4K video output for high-definition displays.
- Audio: 4-pole stereo audio and composite video port.
- Power: USB-C powered for better energy efficiency.
5. Storage:
- The Raspberry Pi 4 uses a microSD card for storage, with the added capability of booting from a USB device, offering more flexibility for storage solutions.
6. Operating System:
- Supports the official Raspberry Pi OS (formerly Raspbian), as well as other operating systems like Ubuntu, Kali Linux, and more.
Popular Uses for the Raspberry Pi 4 Model B
The Raspberry Pi 4 can be used for various projects, making it a favorite among hobbyists and professionals alike. Here are some of the most popular applications:
1. Home Automation Systems:
- Build your smart home hub to control lights, security, and more, all from your Raspberry Pi.
2. Media Center:
- Turn your Raspberry Pi into a media center using software like OSMC or Plex to stream your favorite movies, TV shows, and music.
3. Gaming Console:
- Emulate retro games with RetroPie or Recalbox and relive your favorite gaming moments.
4. Learning to Code:
- Learn to code in programming languages like Python, Scratch, and more. The Raspberry Pi is an excellent tool for beginners to get started with coding.
5. IoT Projects:
- The Raspberry Pi 4 is perfect for DIY IoT projects, thanks to its robust processing power and numerous connectivity options.
Getting Started with Raspberry Pi 4 Model B: A Step-by-Step Guide (Including Software Installation)
Setting up your Raspberry Pi 4 Model B is quick and easy. In this step-by-step guide, we’ll walk you through everything you need to get your Pi up and running, including how to install the operating system (OS) and essential software. Whether you’re using your Raspberry Pi for coding, media, or IoT projects, this guide will get you started in no time.
What You’ll Need:
- Raspberry Pi 4 Model B (4GB)
- MicroSD card (16GB or larger recommended)
- MicroSD card reader
- USB-C power supply
- Micro-HDMI to HDMI cable
- Keyboard and mouse
- Monitor or TV
- Ethernet cable (optional)
Step 1: Download and Install Raspberry Pi Imager
The easiest way to install an OS on your Raspberry Pi is by using the official Raspberry Pi Imager software.
- Download the Raspberry Pi Imager:
- Go to the official Raspberry Pi website and download the Raspberry Pi Imager for your operating system (Windows, macOS, or Linux).
- Install the Raspberry Pi Imager:
- Once downloaded, run the installer and follow the on-screen instructions to install the software on your computer.
Step 2: Install Raspberry Pi OS on the MicroSD Card
Now that you have the Imager installed, it’s time to prepare your microSD card with the operating system.
- Insert the MicroSD Card:
- Connect your microSD card to your computer using a card reader.
- Launch Raspberry Pi Imager:
- Open the Raspberry Pi Imager application.
- Choose an Operating System:
- Click the “Choose OS” button and select Raspberry Pi OS (32-bit) from the list (this is the official OS recommended for most users). If you prefer another OS, you can also select Ubuntu, Kali Linux, or any other supported OS.
- Choose Your Storage:
- Click “Choose Storage” and select your microSD card from the list.
- Write the OS to the MicroSD Card:
- After selecting your OS and storage, click “Write” to begin the installation. The Imager will now download the selected OS and write it to the microSD card. This may take a few minutes.
- Wait for Completion:
- Once the installation is complete, safely eject the microSD card from your computer.
Step 3: Set Up the Raspberry Pi Hardware
- Insert the MicroSD Card:
- Insert the microSD card (with the installed OS) into the slot on the underside of the Raspberry Pi.
- Connect the Keyboard, Mouse, and Monitor:
- Plug in your USB keyboard and mouse.
- Connect your monitor or TV using the micro-HDMI to HDMI cable.
- Connect Power:
- Attach the USB-C power supply to your Raspberry Pi. Once connected, the Pi will automatically boot up.
Step 4: First Boot and Initial Setup
- Boot Up the Raspberry Pi:
- After powering up, the Raspberry Pi will boot directly into the operating system.
- Initial Setup Wizard:
- You will be greeted by the Raspberry Pi Welcome Screen, which will guide you through the initial setup process. Follow these steps:
- Set your country, language, and time zone.
- Set a password for your Raspberry Pi.
- Connect to Wi-Fi (if you’re not using an Ethernet cable).
- Update the software to ensure you have the latest version of Raspberry Pi OS and all drivers.
- You will be greeted by the Raspberry Pi Welcome Screen, which will guide you through the initial setup process. Follow these steps:
- Install Software Updates:
- When prompted, the Raspberry Pi will automatically check for updates and install them. This process can take several minutes, depending on your internet connection. Always keep your system up-to-date for security and performance improvements.
Step 5: Install Essential Software (Optional)
Once your Raspberry Pi is set up and updated, you can install additional software depending on your project needs. Here’s how to install some common software packages:
1. Install Python
Python is pre-installed with Raspberry Pi OS, but if you need the latest version, you can install it using the terminal.
- Open the terminal.
- Run the following commands
sudo apt update
sudo apt install python3
2. Install Visual Studio Code (VS Code)
VS Code is a popular code editor for programming.
Open the terminal.
Add the Microsoft GPG key and repository:
sudo apt update
sudo apt install code -y
Step 6: Explore and Customize Your Raspberry Pi
Congratulations! Your Raspberry Pi 4 Model B is now set up and ready to use. You can start exploring various features, such as:
- Coding: Open the terminal to start writing Python, C++, or JavaScript code.
- Media Center: Install software like Kodi or Plex to create a media center for watching videos and listening to music.
- IoT Projects: Use GPIO pins to create DIY IoT projects, such as temperature sensors, smart home devices, and more.
If you’re new to coding or Linux, take your time exploring the applications pre-installed with Raspberry Pi OS, such as Thonny IDE (for Python) and Scratch (for visual programming)
Conclusion
The Raspberry Pi 4 Model B (4GB) is a powerful, affordable, and accessible tool for anyone looking to explore computing. Whether you’re building projects, learning to code, or simply using it as a portable computer, the possibilities are endless. With the right setup and a bit of creativity, you’ll be amazed at what you can achieve with your Raspberry Pi.
Do you have any favorite projects you’ve completed using your Raspberry Pi 4? Share your experiences and tips in the comments below!