Interfacing R307 Fingerprint Sensor With Arduino

In this tutorial, we will be interfacing the R307 fingerprint sensor with Arduino. The R307 fingerprint sensor is an optical fingerprint sensor that can be used to capture and store fingerprint data.

The sensor has a resolution of 512×288 pixels it can store up to 1000 fingerprint templates. The sensor is interfaced with Arduino using a UART interface.
Required Material
Before we begin, let’s figure out the necessary materials:
- R307 Fingerprint Sensor
- Arduino Uno or similar board
- Jumper wires
- USB cable
R307 Fingerprint Scanner Sensor

The R307 fingerprint sensor module captures and recognizes fingerprints. It uses an optical sensor to capture fingerprints and has a powerful image-processing algorithm that can quickly and accurately recognize fingerprints.
The R307 Sensor can store up to 1000 fingerprints in its built-in memory and has a UART interface that can be used to interface with microcontrollers like Arduino, Raspberry Pi, and other microcontrollers that support UART communication protocol.
The R307 Sensor is commonly used in applications such as security systems and access control systems.
How R307 fingerprint scanners work

The R307 fingerprint sensor works by scanning a person’s fingerprint and creating a digital image of unique patterns of the fingertip. This image is then processed and converted into a mathematical algorithm that is stored on the sensor.
When a fingerprint is scanned again, the sensor compares the new image to the previously stored algorithm to confirm if there is a match. If the print and algorithm are both the same, the sensor will send a signal indicating that the fingerprint is valid.
Pinout R307 Fingerprint Sensor
The R307 Fingerprint Sensor module has 6 pins, with 4 of them used for r communication and power supply. see below the pinout of the R307 Fingerprint Sensor.

Specifications of R307 Fingerprint Sensor
- Model: R307 Fingerprint Sensor
- Sensor Type: Optical
- Resolution: 500 DPI
- Image Capture Area: 15.4mm x 18.2mm
- Image capture time: <1.0s
- Operating Voltage: 3.3V – 6V DC
- Operating Current: <100mA
- Interface: UART/TTL
- Baud Rate: 9600 bps (default), can be changed to other rates19200 bps
- Fingerprint Capacity: Up to 1000 fingerprints
- False Acceptance Rate (FAR): <0.001%
- False Rejection Rate (FRR): <0.1%
- Operating Temperature: -20°C to 50°C
- Operating Humidity: 40% to 85%
- Dimensions: 56 x 20 x 21.5 mm (L x W x H)
- Weight: 12g
Applications of R307 Fingerprint Sensor
The R307 Fingerprint Sensor is widely used in different industries. Here are some of the common applications of the R307 Sensor:
- Access control systems
- Time and attendance systems
- Security systems
- Door locks
- Employee identification systems
- Banking and financial applications
- Healthcare applications
- Government applications
- Smart homes and Internet of Things (IoT) applications.
Difference Between R305 and R307 Fingerprint Sensor
| Description | R305 Sensor | R307 Sensor |
| Storage Capacity (Fingerprints Capacity ) | 250 | 1000 |
| 3.3V Operation | No | Yes |
| USB Operation | No | Yes |
| Finger Detect Output | No | Yes |
Interfacing Fingerprint sensor with Arduino
Firstly connect the Fingerprint Sensor to the Arduino board using jumper wires. Make sure to connect the sensor’s VCC pin to 5V on the Arduino, GND to GND, RX to 3, and TX to 2.

- VCC pin to 5V pin of Arduino
- GND pin to GND pin of Arduino
- TX pin to 2 pins of Arduino
- RX pin to 3-pin Arduino
(You can also refer to the connection diagram above)

Setting up the Adafruit fingerprint sensor R307 Arduino library
For the Fingerprint sensor scanner and the Arduino Nano, you will need to download and install the Adafruit Fingerprint Library in Arduino IDE.
Go to Sketch > Include Library > Manage Libraries and search for “Adafruit Fingerprint“. Install the library and include it in your sketch.

Once the library is installed you have the capability to use the Adafruit Fingerprint Library to capture fingerprints and compare the new ones with pre-stored fingerprints in the chip.
Uploading Code to Arduino Board
Open the Arduino IDE and navigate to the “File” menu, select “Examples” and navigate to the Adafruit fingerprint library. Select the “enroll” example from the list of available examples code.
Upload the enrollment example.
Fingerprint enroll Code
#if (defined(__AVR__) || defined(ESP8266)) && !defined(__AVR_ATmega2560__)
// For UNO and others without hardware serial, we must use software serial...
// pin #2 is IN from sensor (GREEN wire)
// pin #3 is OUT from arduino  (WHITE wire)
// Set up the serial port to use softwareserial..
SoftwareSerial mySerial(2, 3);

#else
// On Leonardo/M0/etc, others with hardware serial, use hardware serial!
// #0 is green wire, #1 is white
#define mySerial Serial1

#endif


Adafruit_Fingerprint finger = Adafruit_Fingerprint(&mySerial);

uint8_t id;

void setup()
{
  Serial.begin(9600);
  while (!Serial);  // For Yun/Leo/Micro/Zero/...
  delay(100);
  Serial.println("\n\nAdafruit Fingerprint sensor enrollment");

  // set the data rate for the sensor serial port
  finger.begin(57600);

  if (finger.verifyPassword()) {
    Serial.println("Found fingerprint sensor!");
  } else {
    Serial.println("Did not find fingerprint sensor :(");
    while (1) { delay(1); }
  }

  Serial.println(F("Reading sensor parameters"));
  finger.getParameters();
  Serial.print(F("Status: 0x")); Serial.println(finger.status_reg, HEX);
  Serial.print(F("Sys ID: 0x")); Serial.println(finger.system_id, HEX);
  Serial.print(F("Capacity: ")); Serial.println(finger.capacity);
  Serial.print(F("Security level: ")); Serial.println(finger.security_level);
  Serial.print(F("Device address: ")); Serial.println(finger.device_addr, HEX);
  Serial.print(F("Packet len: ")); Serial.println(finger.packet_len);
  Serial.print(F("Baud rate: ")); Serial.println(finger.baud_rate);
}

uint8_t readnumber(void) {
  uint8_t num = 0;

  while (num == 0) {
    while (! Serial.available());
    num = Serial.parseInt();
  }
  return num;
}

void loop()                     // run over and over again
{
  Serial.println("Ready to enroll a fingerprint!");
  Serial.println("Please type in the ID # (from 1 to 127) you want to save this finger as...");
  id = readnumber();
  if (id == 0) {// ID #0 not allowed, try again!
     return;
  }
  Serial.print("Enrolling ID #");
  Serial.println(id);

  while (!  getFingerprintEnroll() );
}

uint8_t getFingerprintEnroll() {

  int p = -1;
  Serial.print("Waiting for valid finger to enroll as #"); Serial.println(id);
  while (p != FINGERPRINT_OK) {
    p = finger.getImage();
    switch (p) {
    case FINGERPRINT_OK:
      Serial.println("Image taken");
      break;
    case FINGERPRINT_NOFINGER:
      Serial.println(".");
      break;
    case FINGERPRINT_PACKETRECIEVEERR:
      Serial.println("Communication error");
      break;
    case FINGERPRINT_IMAGEFAIL:
      Serial.println("Imaging error");
      break;
    default:
      Serial.println("Unknown error");
      break;
    }
  }

  // OK success!

  p = finger.image2Tz(1);
  switch (p) {
    case FINGERPRINT_OK:
      Serial.println("Image converted");
      break;
    case FINGERPRINT_IMAGEMESS:
      Serial.println("Image too messy");
      return p;
    case FINGERPRINT_PACKETRECIEVEERR:
      Serial.println("Communication error");
      return p;
    case FINGERPRINT_FEATUREFAIL:
      Serial.println("Could not find fingerprint features");
      return p;
    case FINGERPRINT_INVALIDIMAGE:
      Serial.println("Could not find fingerprint features");
      return p;
    default:
      Serial.println("Unknown error");
      return p;
  }

  Serial.println("Remove finger");
  delay(2000);
  p = 0;
  while (p != FINGERPRINT_NOFINGER) {
    p = finger.getImage();
  }
  Serial.print("ID "); Serial.println(id);
  p = -1;
  Serial.println("Place same finger again");
  while (p != FINGERPRINT_OK) {
    p = finger.getImage();
    switch (p) {
    case FINGERPRINT_OK:
      Serial.println("Image taken");
      break;
    case FINGERPRINT_NOFINGER:
      Serial.print(".");
      break;
    case FINGERPRINT_PACKETRECIEVEERR:
      Serial.println("Communication error");
      break;
    case FINGERPRINT_IMAGEFAIL:
      Serial.println("Imaging error");
      break;
    default:
      Serial.println("Unknown error");
      break;
    }
  }

  // OK success!

  p = finger.image2Tz(2);
  switch (p) {
    case FINGERPRINT_OK:
      Serial.println("Image converted");
      break;
    case FINGERPRINT_IMAGEMESS:
      Serial.println("Image too messy");
      return p;
    case FINGERPRINT_PACKETRECIEVEERR:
      Serial.println("Communication error");
      return p;
    case FINGERPRINT_FEATUREFAIL:
      Serial.println("Could not find fingerprint features");
      return p;
    case FINGERPRINT_INVALIDIMAGE:
      Serial.println("Could not find fingerprint features");
      return p;
    default:
      Serial.println("Unknown error");
      return p;
  }

  // OK converted!
  Serial.print("Creating model for #");  Serial.println(id);

  p = finger.createModel();
  if (p == FINGERPRINT_OK) {
    Serial.println("Prints matched!");
  } else if (p == FINGERPRINT_PACKETRECIEVEERR) {
    Serial.println("Communication error");
    return p;
  } else if (p == FINGERPRINT_ENROLLMISMATCH) {
    Serial.println("Fingerprints did not match");
    return p;
  } else {
    Serial.println("Unknown error");
    return p;
  }

  Serial.print("ID "); Serial.println(id);
  p = finger.storeModel(id);
  if (p == FINGERPRINT_OK) {
    Serial.println("Stored!");
  } else if (p == FINGERPRINT_PACKETRECIEVEERR) {
    Serial.println("Communication error");
    return p;
  } else if (p == FINGERPRINT_BADLOCATION) {
    Serial.println("Could not store in that location");
    return p;
  } else if (p == FINGERPRINT_FLASHERR) {
    Serial.println("Error writing to flash");
    return p;
  } else {
    Serial.println("Unknown error");
    return p;
  }

  return true;
}
Connect your Arduino board, and then upload the “enroll” example to your board.
Once the upload is complete, open the Serial Monitor in the Arduino IDE to view the output, In the Serial Monitor select a baud rate of “9600″.
Enroll Fingerprint :

- Set the fingerprint ID number according to the code.
- Place an enrolled finger on the sensor

- Place the finger again on the sensor for confirmation.

Final Code :
Since we have enrolled the fingerprints in the last step, now we can test if this sensor is working, or let’s check for a match using the
- Choose the fingerprint example.
- Upload the fingerprint example.
#if (defined(__AVR__) || defined(ESP8266)) && !defined(__AVR_ATmega2560__)
// For UNO and others without hardware serial, we must use software serial...
// pin #2 is IN from sensor (GREEN wire)
// pin #3 is OUT from arduino (WHITE wire)
// Set up the serial port to use softwareserial..
SoftwareSerial mySerial(2, 3);
#else
// On Leonardo/M0/etc, others with hardware serial, use hardware serial!
// #0 is green wire, #1 is white
#define mySerial Serial1
#endif
Adafruit_Fingerprint finger = Adafruit_Fingerprint(&mySerial);
void setup()
{
Serial.begin(9600);
while (!Serial); // For Yun/Leo/Micro/Zero/...
delay(100);
Serial.println("\n\nAdafruit finger detect test");
// set the data rate for the sensor serial port
finger.begin(57600);
delay(5);
if (finger.verifyPassword()) {
Serial.println("Found fingerprint sensor!");
} else {
Serial.println("Did not find fingerprint sensor :(");
while (1) { delay(1); }
}
Serial.println(F("Reading sensor parameters"));
finger.getParameters();
Serial.print(F("Status: 0x")); Serial.println(finger.status_reg, HEX);
Serial.print(F("Sys ID: 0x")); Serial.println(finger.system_id, HEX);
Serial.print(F("Capacity: ")); Serial.println(finger.capacity);
Serial.print(F("Security level: ")); Serial.println(finger.security_level);
Serial.print(F("Device address: ")); Serial.println(finger.device_addr, HEX);
Serial.print(F("Packet len: ")); Serial.println(finger.packet_len);
Serial.print(F("Baud rate: ")); Serial.println(finger.baud_rate);
finger.getTemplateCount();
if (finger.templateCount == 0) {
Serial.print("Sensor doesn't contain any fingerprint data. Please run the 'enroll' example.");
}
else {
Serial.println("Waiting for valid finger...");
Serial.print("Sensor contains "); Serial.print(finger.templateCount); Serial.println(" templates");
}
}
void loop() // run over and over again
{
getFingerprintID();
delay(50); //don't ned to run this at full speed.
}
uint8_t getFingerprintID() {
uint8_t p = finger.getImage();
switch (p) {
case FINGERPRINT_OK:
Serial.println("Image taken");
break;
case FINGERPRINT_NOFINGER:
Serial.println("No finger detected");
return p;
case FINGERPRINT_PACKETRECIEVEERR:
Serial.println("Communication error");
return p;
case FINGERPRINT_IMAGEFAIL:
Serial.println("Imaging error");
return p;
default:
Serial.println("Unknown error");
return p;
}
// OK success!
p = finger.image2Tz();
switch (p) {
case FINGERPRINT_OK:
Serial.println("Image converted");
break;
case FINGERPRINT_IMAGEMESS:
Serial.println("Image too messy");
return p;
case FINGERPRINT_PACKETRECIEVEERR:
Serial.println("Communication error");
return p;
case FINGERPRINT_FEATUREFAIL:
Serial.println("Could not find fingerprint features");
return p;
case FINGERPRINT_INVALIDIMAGE:
Serial.println("Could not find fingerprint features");
return p;
default:
Serial.println("Unknown error");
return p;
}
// OK converted!
p = finger.fingerSearch();
if (p == FINGERPRINT_OK) {
Serial.println("Found a print match!");
} else if (p == FINGERPRINT_PACKETRECIEVEERR) {
Serial.println("Communication error");
return p;
} else if (p == FINGERPRINT_NOTFOUND) {
Serial.println("Did not find a match");
return p;
} else {
Serial.println("Unknown error");
return p;
}
// found a match!
Serial.print("Found ID #"); Serial.print(finger.fingerID);
Serial.print(" with confidence of "); Serial.println(finger.confidence);
return finger.fingerID;
}
// returns -1 if failed, otherwise returns ID #
int getFingerprintIDez() {
uint8_t p = finger.getImage();
if (p != FINGERPRINT_OK) return -1;
p = finger.image2Tz();
if (p != FINGERPRINT_OK) return -1;
p = finger.fingerFastSearch();
if (p != FINGERPRINT_OK) return -1;
// found a match!
Serial.print("Found ID #"); Serial.print(finger.fingerID);
Serial.print(" with confidence of "); Serial.println(finger.confidence);
return finger.fingerID;
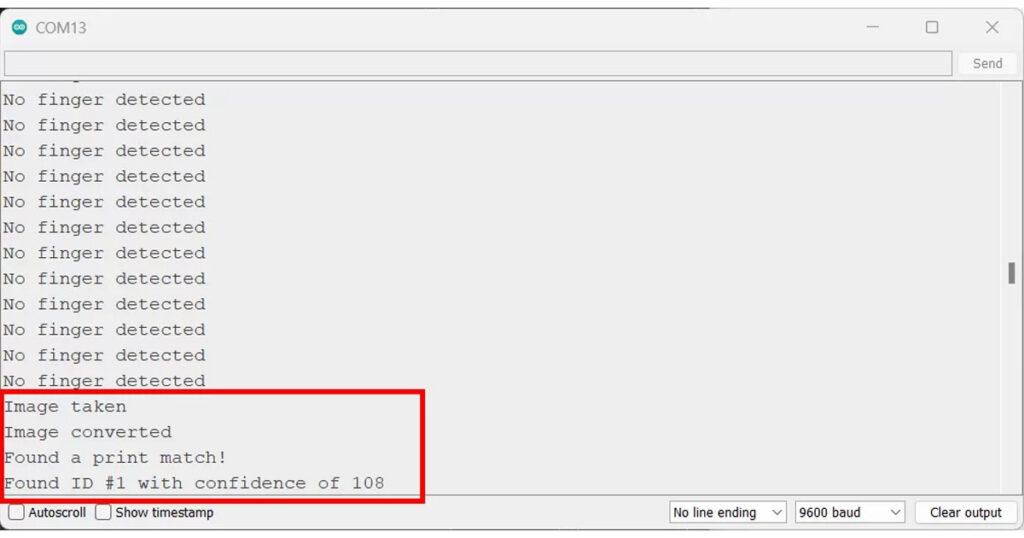
}Once the fingerprints have been registered, the example fingerprint can be loaded, the sketch reads the fingerprint from the sensor and it tells us how constant the result is with its database.