7″ Official Raspberry Pi Display with Capacitive Touchscreen
The 7″ Official Raspberry Pi Display with capacitive touchscreen is a versatile, high-quality addition to any Raspberry Pi project. Whether you’re building a smart home dashboard, an interactive kiosk, or a portable Raspberry Pi-powered device, this display offers ease of use, multi-touch support, and excellent visual performance.
In this blog post, we’ll cover the key features of the display, its technical specifications, and potential applications for your projects.
Key Features of the 7″ Raspberry Pi Display
Here are some of the standout features that make the 7″ display an ideal companion for your Raspberry Pi:
- 7-inch screen size with an 800×480 resolution, providing a crisp and clear visual output.
- Capacitive touchscreen supporting up to 10 simultaneous touches, allowing for advanced multi-touch functionality.
- DSI interface (Display Serial Interface) connection for fast data transfer between the display and the Raspberry Pi, avoiding the need for additional adapters.
- Plug-and-play setup with included jumper wires and a ribbon cable to easily connect to the Raspberry Pi GPIO pins for power and data.
- Mounting points allow you to secure the Raspberry Pi directly to the back of the display, creating a compact and integrated solution.
- Wide compatibility with most Raspberry Pi models, including Raspberry Pi 4, Raspberry Pi 3, and Raspberry Pi Zero, as long as they have a DSI port.
Technical Specifications
| Specification | Details |
|---|---|
| Display Size | 7 inches |
| Resolution | 800×480 pixels |
| Touchscreen | Capacitive, 10-point multi-touch |
| Interface | DSI (Display Serial Interface) |
| Power | Powered via GPIO or external supply |
| Compatibility | Works with Raspberry Pi models with DSI connector |
Setting Up the 7″ Raspberry Pi Display
1. Connecting the Display
The 7″ touchscreen connects via the Raspberry Pi’s DSI port using the provided ribbon cable. Power is supplied either through the Raspberry Pi’s GPIO pins using the included jumper wires or via an external power supply.
2. Mounting the Raspberry Pi
For a neat, integrated setup, the display comes with mounting points to secure the Raspberry Pi directly on the back of the screen. This makes it easy to create a compact, all-in-one unit.
3. Touchscreen Functionality
The capacitive touchscreen is highly responsive and supports up to 10 touchpoints simultaneously, enabling you to create more complex, interactive applications such as multi-touch gestures, drawing applications, or touch-based games.
4. Software Configuration
The Raspberry Pi OS (formerly Raspbian) should automatically detect the display. If needed, you can adjust the screen orientation by modifying the config.txt file.
Applications and Use Cases
The 7″ Raspberry Pi touchscreen is perfect for a wide range of applications. Here are a few examples of how it can be used:
1. Home Automation Control Panel
Create an interactive touchscreen interface for managing smart home devices, such as lights, thermostats, or security cameras. With the built-in touchscreen, it’s easy to control your home automation system at the touch of a button.
2. Portable Raspberry Pi Computer
Pair the 7″ display with a compact keyboard and you’ve got a portable Raspberry Pi-powered computer. Whether for coding, web browsing, or playing retro games, the setup makes for a lightweight and functional device.
3. IoT Dashboards
Use the display to monitor real-time data from sensors or IoT devices. Display metrics like temperature, humidity, or other sensor data on an interactive, touch-controlled dashboard.
4. Multimedia Controller
Control your media center, such as Kodi or Plex, using the touchscreen interface. Play, pause, and browse through your media library with ease.
5. Retro Gaming Console
Combine the touchscreen display with a Raspberry Pi and RetroPie or Lakka to create a portable retro gaming console. The touch input can also be integrated into custom games or emulators that support touch-based controls.
What is a Capacitive Touchscreen?
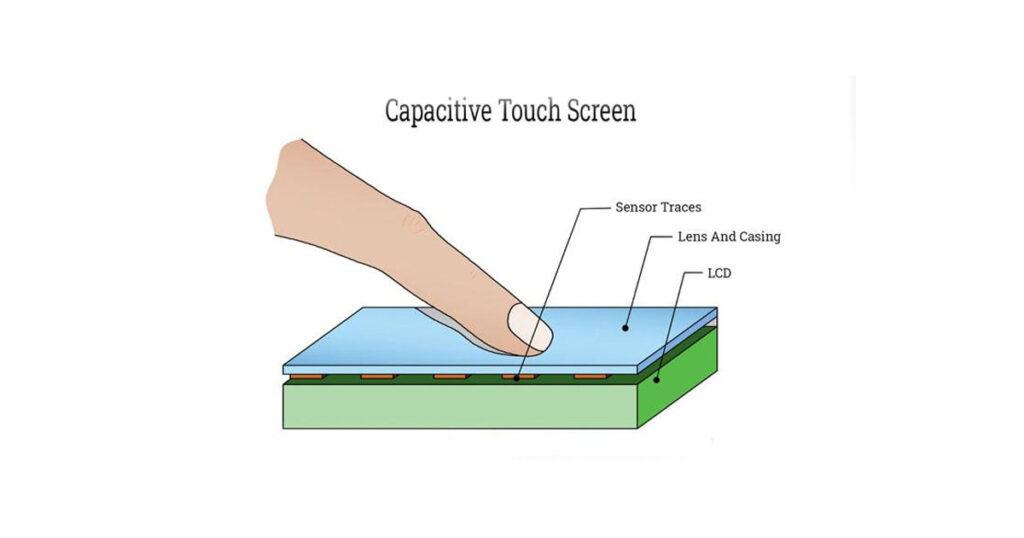
A capacitive touchscreen is a touch-sensitive display that detects touch through changes in electrical charge. Unlike resistive touchscreens that require physical pressure to sense input, capacitive screens are more sensitive and can detect even light touches. They are made up of a layer of capacitive material—usually indium tin oxide—placed between layers of protective glass or plastic.
The technology allows for:
- Multi-touch functionality: Detecting multiple touch points simultaneously.
- High responsiveness: Reacting instantly to finger touches, making for a smoother user experience.
- Durability: Since there’s no need for pressure, capacitive screens are more durable and wear-resistant over time.
How Capacitive Touchscreens Work
The capacitive touchscreen operates based on the conductive properties of the human body. Here’s a simplified breakdown of how it works:
- Electrical Charge Layer: The screen is coated with a transparent conductor (often indium tin oxide) that holds an electrical charge.
- Touch Detection: When a user touches the screen with their finger, they disrupt the electrostatic field by drawing away some of the charge.
- Sensors: Electrodes located around the screen measure the changes in the charge at different points on the screen.
- Touch Location: The system calculates the precise location of the touch by determining where the electrostatic field has been altered.
- Touch Processing: This information is sent to the processor, which then reacts to the touch event (like opening an app or scrolling a page).
Unlike resistive touchscreens that use layers that physically bend, capacitive screens rely on sensing electrical signals, which is why they are more sensitive and responsive.
Advantages of Capacitive Touch Technology
Capacitive touchscreens have several advantages over traditional resistive touchscreens:
1. Multi-Touch Support
Capacitive touchscreens can detect multiple touch points at the same time. The 7″ Official Raspberry Pi Display supports up to 10 simultaneous touches, enabling advanced gestures like pinch-to-zoom, swipe, and more complex multi-finger operations.
2. High Sensitivity and Accuracy
Capacitive screens are highly responsive, requiring only a light touch to register input. This makes interactions smooth and precise, allowing for a seamless experience when navigating menus, playing games, or interacting with applications.
3. Clearer Display Quality
Since capacitive touchscreens use a thin, transparent conductive layer, they allow for brighter and clearer displays compared to resistive touchscreens. This makes the 7″ Raspberry Pi Display ideal for media-rich applications where display quality is crucial.
4. Durability
Capacitive touchscreens are more durable than their resistive counterparts. They are typically protected by layers of glass or hard plastic, making them resistant to wear and tear, scratches, and physical impact. Since there is no need to apply physical pressure, capacitive screens also last longer.
5. Better Aesthetic Design
Capacitive touchscreens allow for sleeker, more modern-looking devices. The absence of physical buttons and the responsiveness of the touchscreen make devices look more futuristic and user-friendly, which is why capacitive screens are the standard for most modern gadgets.
Applications of Capacitive Touchscreens in Raspberry Pi Projects
The 7″ Official Raspberry Pi Display with capacitive touchscreen opens up a range of possibilities for interactive projects. Here are a few ways you can take advantage of the touchscreen’s multi-touch capabilities:
1. Interactive Dashboards
Create real-time dashboards for monitoring data from sensors, IoT devices, or servers. Use the touchscreen to zoom in on data points, scroll through logs, and interact with various controls.
2. Kiosk Applications
Build an interactive kiosk for public use. The multi-touch functionality allows users to navigate menus, fill out forms, or select options quickly and easily, without the need for a mouse or keyboard.
3. Media Control Systems
Control media playback using intuitive gestures. Skip songs, adjust volume, and browse through playlists with simple taps or swipes.
4. Gaming
Capacitive touchscreens are great for gaming. You can integrate the display into a retro gaming console where users control games with on-screen buttons or even develop custom touch-based games that use multi-touch gestures for input.
5. Smart Home Controllers
Use the touchscreen to control smart home systems such as lighting, heating, or security. The high sensitivity ensures that even the lightest touch quickly registers, making it convenient to interact with your system.
Why the 7″ Raspberry Pi Display is Ideal for Capacitive Touch
The 7″ Official Raspberry Pi Display is the perfect candidate for capacitive touchscreen technology due to its:
- High responsiveness: Perfect for creating user interfaces where speed and accuracy matter.
- Multi-touch support: Essential for applications involving gesture controls or interactive interfaces.
- Durable construction: With capacitive technology protected by a solid glass layer, it’s built to withstand regular use.
Installing and Setting Up the 7″ Official Raspberry Pi Display with Capacitive Touchscreen
The 7″ Official Raspberry Pi Display with Capacitive Touchscreen is a versatile and user-friendly display solution for your Raspberry Pi projects. It supports touch input, making it ideal for applications requiring a touchscreen interface. In this guide, we’ll walk you through the steps to install and set up the display on your Raspberry Pi, ensuring you can get started on your projects as quickly as possible.
What You’ll Need:
- Raspberry Pi (any model with a display connector)
- 7″ Official Raspberry Pi Display with Capacitive Touchscreen
- MicroSD card with Raspberry Pi OS installed
- Power supply (5V, 2.5A minimum)
- Jumper wires (included with the display)
- Screwdriver (optional)
Step 1: Prepare Your Raspberry Pi and Display
Before you begin, make sure you have everything ready. The touchscreen display comes with a ribbon cable for data transmission and jumper wires for power.
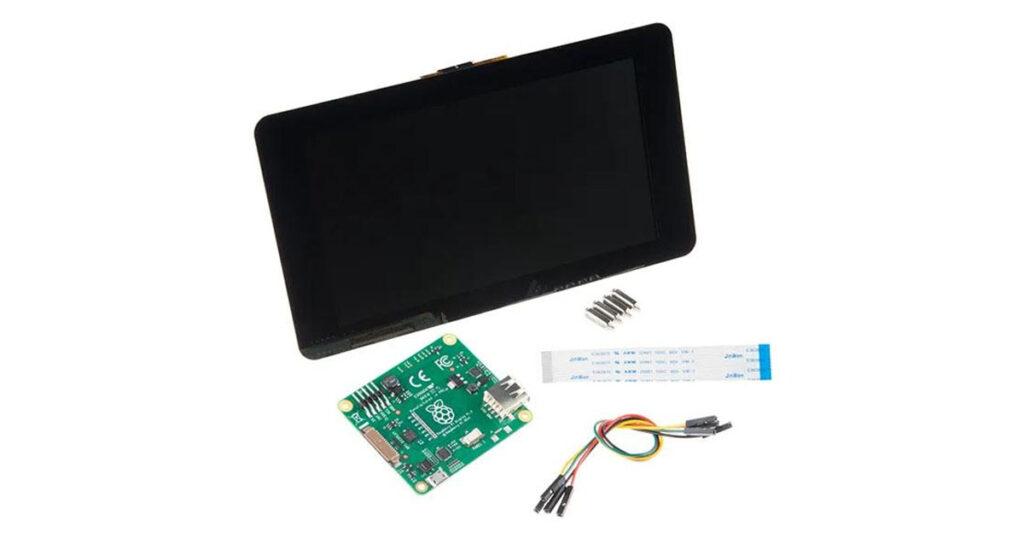
Unbox the Display
Inside the box, you should find:
- The 7″ touchscreen display
- A ribbon cable for the display connector
- Four jumper wires for power and ground connections
- Mounting hardware (optional)
Step 2: Connect the Display to the Raspberry Pi
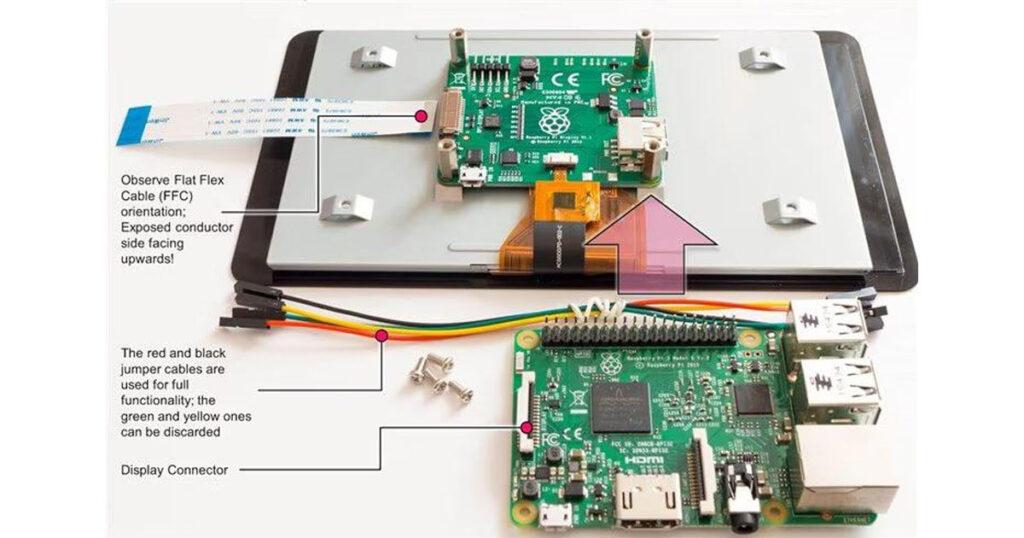
1. Connect the Display Ribbon Cable
- On the back of the touchscreen, there is a DSI (Display Serial Interface) connector.
- Insert the ribbon cable into the DSI connector on the display (the white connector). Make sure the metal connectors on the ribbon cable face the connector on the board.
- Lock the cable into place by pushing down the connector clip.
2. Connect the Ribbon Cable to the Raspberry Pi
- On the Raspberry Pi board, locate the DSI display connector. It’s a flat, thin connector usually positioned between the HDMI and the power connector.
- Pull up the locking mechanism of the DSI port on the Raspberry Pi, insert the ribbon cable with the same orientation (metal contacts facing the contacts inside the port), and push the locking mechanism back into place.
Step 3: Powering the Display
You’ll use jumper wires to power the display directly from the Raspberry Pi’s GPIO (General Purpose Input/Output) pins.
1. Identify GPIO Pins
- The Raspberry Pi GPIO pins are located on the edge of the board. You’ll be connecting the power (5V) and ground (GND) pins from the Raspberry Pi to the display.
2. Connect Power
- Take the jumper wires provided and connect the 5V pin on the Raspberry Pi GPIO header to the 5V pin on the touchscreen display board.
- Connect the GND pin on the Raspberry Pi to the GND pin on the touchscreen display.
Power Pin Setup:
- Pin 2 (5V) on the Raspberry Pi goes to the 5V pin on the display.
- Pin 6 (GND) on the Raspberry Pi goes to the GND pin on the display.
You can also power the display with an external source if needed, but powering through the GPIO pins is generally simpler.
Step 4: Mounting the Display and Raspberry Pi (Optional)
The touchscreen comes with mounting points to secure the Raspberry Pi directly to the back of the display.
1. Screw the Raspberry Pi to the Display
- Use the screws and standoffs provided in the kit to mount the Raspberry Pi to the back of the display.
- This step is optional, but it provides a cleaner and more compact setup, particularly if you want to use the display in a case or as a standalone unit.
Step 5: Boot Up the Raspberry Pi
With everything connected, it’s time to boot up your Raspberry Pi.
1. Insert the microSD Card
- Ensure that you have a microSD card with the latest version of Raspberry Pi OS installed.
- Insert the microSD card into the slot on your Raspberry Pi.
2. Power On the Raspberry Pi
- Connect the power supply to your Raspberry Pi.
- The display should power on automatically when the Raspberry Pi starts up.
Step 6: Configure the Display
Raspberry Pi OS should automatically detect the display and touchscreen on boot. However, if the display doesn’t function properly, or if you encounter calibration issues, follow these additional steps.
1. Update the Raspberry Pi OS
- Open a terminal window on your Raspberry Pi.
- Run the following commands to update the software and ensure the display drivers are up to date:
sudo apt update
sudo apt full-upgrade
This will ensure you have the latest drivers and firmware.
2. Adjust Screen Rotation (Optional)
If your display is upside down or you need to adjust the orientation, you can rotate the screen by editing the boot configuration file.
- Open the configuration file by running:
sudo nano /boot/config.txtAdd the following line at the end of the file to rotate the display by 180 degrees (if needed):
lcd_rotate=2Save and close the file (CTRL+X, then Y, then ENTER).
Reboot your Raspberry Pi for the changes to take effect:
sudo rebootStep 7: Test the Touchscreen Functionality
After the system boots up, the touchscreen should work out-of-the-box. You can test the functionality by interacting with the Raspberry Pi desktop environment.
- Check for responsiveness: The touchscreen should respond to your taps, and you should be able to control the mouse cursor by touching the screen.
- Multi-touch support: The display supports 10-finger multi-touch, so you can test multi-touch gestures such as pinch-to-zoom.
If you encounter any issues with the touchscreen, try running a full system update (as described above) or consult the Raspberry Pi forums for specific troubleshooting tips.
Conclusion
The 7″ Official Raspberry Pi Display with Capacitive Touchscreen is a powerful accessory that unlocks a variety of interactive and graphical capabilities for your Raspberry Pi projects. By following the steps outlined in this guide, you should now have the display set up and functioning properly.
This setup is ideal for projects such as home automation systems, multimedia controllers, and even portable Raspberry Pi-based computers. Let your creativity flow and start building!