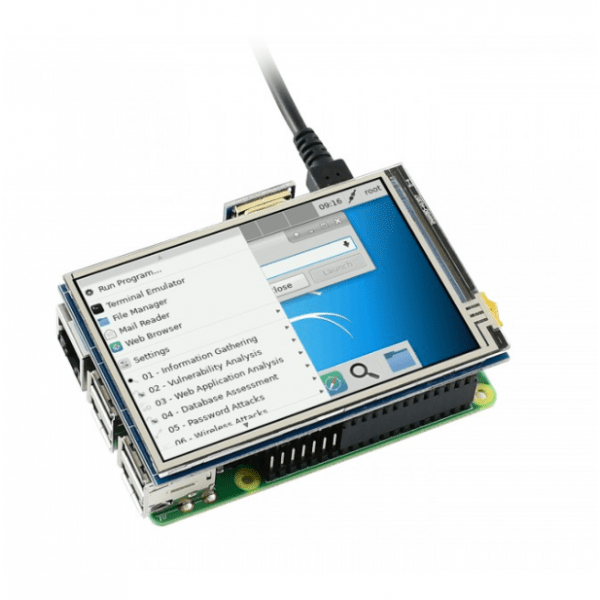
3.5″ Touch Screen LCD Raspberry Pi Display
Introduction :
Raspberry Pi is a compact yet powerful computing platform that has become a favorite among hobbyists, educators, and engineers alike. One of the most versatile ways to expand its capabilities is by adding a touch screen display, making it possible to build interactive and portable projects. A 3.5″ touch screen LCD offers a compact solution for displaying data, videos, and apps while allowing direct user interaction through touch inputs. In this blog, we will guide you through the process of interfacing a 3.5″ touch screen LCD with Raspberry Pi, transforming it into a mini-computer or control hub with a responsive display. Whether you’re looking to build a portable media center, IoT dashboard, or custom project, this setup opens up a world of possibilities.
Interfacing a 3.5″ Touch Screen LCD with Raspberry Pi:
Step-by-Step Guide
Raspberry Pi is a powerful and compact platform that can be used for a variety of DIY projects. When paired with a 3.5″ touch screen LCD, it turns into a portable display and input device, perfect for small-scale multimedia projects, IoT applications, and more. In this blog, we will walk you through the steps to interface a 3.5″ touch screen LCD with Raspberry Pi, including wiring, setup, and a demonstration of its functionality.
Prerequisites
- Raspberry Pi (any version with a 40-pin GPIO header)
- 3.5″ Touch Screen LCD (with a compatible Raspberry Pi interface)
- microSD card with Raspberry Pi OS
- Power supply for Raspberry Pi
- HDMI cable and monitor (optional for setup)
- Keyboard and mouse (optional)
Step 1: Preparing the Hardware
Connect the Touch Screen LCD to the Raspberry Pi :
- Align the 3.5″ LCD screen with the GPIO pins on the Raspberry Pi. The screen should slide directly onto the pins, fitting snugly over them. Be careful to align the pins properly, so they connect to the correct headers.
- Make sure the display is securely seated. The screen should not wiggle or feel loose.
Step 2: Install Raspberry Pi OS
If you haven’t already installed Raspberry Pi OS on your microSD card, follow these steps:
- Download the official Raspberry Pi Imager.
- Install the Imager and run it.
- Insert the microSD card into your computer, choose “Raspberry Pi OS” from the OS options, and write it to the card.
Step 3: Initial Boot and Setup
- Insert the microSD card into the Raspberry Pi.
- Connect the keyboard, mouse, and HDMI cable (optional) to the Raspberry Pi to access it on a larger display.
- Plug in the power supply to boot the Raspberry Pi.
The Raspberry Pi will boot up, and if you’re using an external monitor, you should see the Raspberry Pi desktop.
Step 4: Install Touch Screen Drivers
Now that your hardware is connected and your Raspberry Pi OS is running, it’s time to install the necessary drivers for the touch screen LCD.
- Open a terminal window on the Raspberry Pi.
- Install the required drivers for your 3.5″ screen. Most 3.5″ touch screens use the same driver base, which can be installed with these commands:
sudo apt-get update
sudo apt-get upgrade
- Clone the driver repository. For example, if you’re using the Waveshare 3.5″ LCD, you can use:
https://github.com/waveshare/LCD-show.git
cd LCD-show/
chmod +x LCD35-show
- Run the driver script:
./LCD35-show
After running the script, the Raspberry Pi will reboot, and the display should activate.
Step 5: Calibrate the Touch Screen
Once the Raspberry Pi reboots, the display should show the desktop on the 3.5″ LCD. However, you may need to calibrate the touch functionality to ensure it works correctly.
- Open a terminal window and run the calibration utility:
sudo apt-get install -y xinput-calibrator
xinput_calibrator
- Follow the on-screen instructions to calibrate the touch screen.
Step 6: Testing the Display and Touch Functionality
Once the touch screen is calibrated, you should be able to interact with the Raspberry Pi directly from the 3.5″ display using your fingers.
- Open apps and menus using touch.
- Drag and drop files or adjust settings as you would with a mouse.
Optional: Adjust Screen Rotation If you need to rotate the screen for a different orientation, you can edit the /boot/config.txt file:
sudo nano /boot/config.txt
Add the following line:
lcd_rotate=2
This rotates the display by 180 degrees. Adjust the number according to your desired orientation (0, 1, 2, 3).
Step 7: Project Ideas Using 3.5″ Touch Screen LCD
Here are a few project ideas that you can implement using your new touch screen setup:
- Portable Media Center: Use your touch screen as an interface for a portable Kodi media center.
- IoT Control Hub: Turn the Raspberry Pi and touch screen into an IoT hub that controls smart devices around your home.
- Retro Gaming Console: Build a mini retro gaming system with the touch screen acting as the display.
Conclusion
Interfacing a 3.5″ touch screen LCD with Raspberry Pi is a straightforward process that opens up new possibilities for your projects. Whether you’re creating a portable device, control panel, or simply want a more interactive Raspberry Pi experience, the addition of a touch screen can make your projects more versatile and user-friendly.